Quick Links
The Adamantine Forge questline is one of the most difficult to find and complete in Baldur's Gate 3. Requiring you to venture deep into the Underdark, take on scores of enemies, seek out hidden passages, and defeat the single hardest boss in the early game, this quest is no joke, and neither are its rewards.
Should you be willing to undertake the veritable mountain of tasks to reach and activate the Adamantine Forge, you'll be rewarded with a way to craft some of the best armor in the game. Additionally, the experience gained along the way is certain to see you up at least one level, at least not two. Tempted yet?
Getting Started: Entering Grymforge

Grymforge, an area of the Underdark, is the prerequisite area to reaching the Adamantine Forge. There are several ways to reach this area, but there are two main options:
- Travel from the Goblin Camp hidden Underdark entrance
- Travel from the Decrepit Village (from any other Underdark entrance)
The easiest way is to come from the Goblin Camp, which is part of the main quest line.

However, if you come from the Decrepit Village, you'll have the opportunity to take several relevant quests along the way. This includes a quest from the Myconids to clear out the Decrepit Village of Duergar Dwarf Slavers and a special request from an ill gnome named Thulla in the Myconid Colony.
Either way, you'll need to get past the dwarves of the Decrepit Village and take their boat into Grymforge. You'll be questioned by a dwarf on the way. Convince him that you had no part in the dwarves of the Decrepit Village's demise, or push him into the water and take off on your own.
Once you land, you'll be questioned again by another guard. Convince her to let you in and stay.
This is easier if you're a Drow, a (Duergar) Dwarf, or bear the Mark of the Absolute.
Entering The Ancient Forge

Once you're in, you'll need to make your way past Grymforge and into the Ancient Forge area.
First, take the path up the stairs and then to the right from the docks area. Go past the rubble until you find some dwarves using a pair of rothe (animals that look like giant fantasy rams) to clear rubble. The dwarves will ask you to help them get the rothe to clear the rubble.
You can convince the rothe using Animal Handling to clear the rubble, speak with them using Speak with Animals to use your Persuasion, or use force to scare them into submission.

Either way, the dwarves here will attack you once the rubble is gone. If you've made good with the rothe, they'll join you in the fight against them.
One of these dwarves is easily dealt with due to her proximity to the edge. Either you or the rothe can shove her over the edge for instant death.

Once you're past the rubble, follow the set of stairs and the main path until you come across a bridge with flames spraying across it.
There are several traps on this bridge, and you'll need to cross slowly and watch for traps at your feet. These traps can launch you into flames. Disarm them as you go.

Reaching a set of stairs on your left, take them down and stop trying to cross the bridge. At this point, it is impossible to cross, as the trap you must disarm cannot be disarmed due to the length of a fire trap at the end of the bridge (you'll die trying). Instead, there is a lever mechanism that can control the metal bridge above.
To begin, send one character across by having them jump onto the metal bridge and then move it up and out to the path with the door on the opposite side of the room. This door is the entrance to the Goblin Camp behind Priestess Gut's chapel. However, that's not why you're here.
Move the bridge back down and send all your remaining characters across onto the metal pathway leading down the center of the room. Send them down until you reach a dead end with another moving metal platform.

Your solo character should continue down the path on their side past the Goblin Camp door and up to a dead end with a set of levers. Control the platform to let your party-of-three jump on. Then, move the platform across the room where they can jump off onto another metal path on the other side.
Continuing down the path will bring them into a new area where a Waypoint into the Ancient Forge will be discovered. Your solo character can warp here to rejoin the group.
Do not attempt to start the Free Nere quest by interacting with the rubble down below in Grymforge (if you haven't done it yet). Attempting to Long Rest while this quest is active will cause you to automatically fail the quest and all those within the rubble to die.
Operating The Forge: Finding Moulds And Mithril

Getting the forge to work will require finding a few material components first. The first component is very easy to find: a mould. There are several moulds, but the armor moulds are the easiest to find.
The Splint Mould for the Adamantine Heavy Armor can be found by going up the stairs to the left when entering the room from the Waypoint side. Once you reach the top of the first set of stairs, look left to find a body and a rectangular object (the mould) on the rocky cliffside.

The Scale Mail Mould for the Adamantine Medium Armor is found by going right when entering the room from the Waypoint side. It's on the ground in front of a small walled outpost.
Beware, however, of the Animated Armor enemies patrolling on the wall. You'll need to fight to snatch the Scale Mail Mould in a 4v4 battle. Three are on the wall in spots that make it difficult to fire ranged weapons, and one is hiding off to the left and down a set of broken stairs.
The other weapon moulds can be found around this area as well:
Longsword Mould | Found on the central metal bridge in Grymforge near the first set of levers. |
|---|---|
Mace Mould | Found on the table near the Ancient Forge Waypoint. |
Scimitar Mould | Found on a skeleton directly left of the second set of control levers in Grymforge. |
Shield Mould | Found on a skeleton at the top of the stairs in the room past the first set of doors to the Goblin Camp entrance. |

Once you have at least one mould, you'll now be able to search for Mithril, a necessary crafting component.
There are six moulds, but there are only two Mithril Ore deposits:
- One at the Ancient Temple, located behind the outpost guarding the Scale Mail Mould and reachable only by Misty Step or the Githyanki Psionic Jump (plusFeather Fall)
- One down the path to the Adamantine Forge, turning left after your first jump down the stairs to a path leading to a library-looking area
The first one is guarded by the Animated Armors. It's an easier fighter but requires certain feats to actually reach.
The second is a far, far harder fight guarded by swarms of Magma Mephits that are highly dangerous. Once one swarm of Magma Mephits has taken enough damage, more will appear for as many as ten mephits that can use Heat Metal to deal massive amounts of damage.

Whichever you choose, you'll need to break the ore deposit to receive one Mithril Ore. Take that ore and your mould down the stairs to the central chamber where the forge awaits.
Place the Mithril Ore in the Crucible chamber in the center. Then, place your mould of choice into the mould chamber to the right of it.
If you change your mind about the mould you want to place, you'll need to hit the lever next to the mould chamber to re-open it.

Run over to the lever on the upper right side. Pull it, bringing down the forge's hammer and lowering the entire platform.
From here, you'll want to ensure a few things:
- All of your party members are standing on the higher parts of the platforms on the forge (preferably the big circles)
- One of your party members is next to the lever that operates the hammer
- Each of your party members are spread out
- You have as many bludgeoning weapons equipped as you own
- Your party is at full health
Send only one of your party members to operate a wheel-like device that allows the lava to flow into the forge. Once activated, the protector of the forge, Grym will reveal himself.
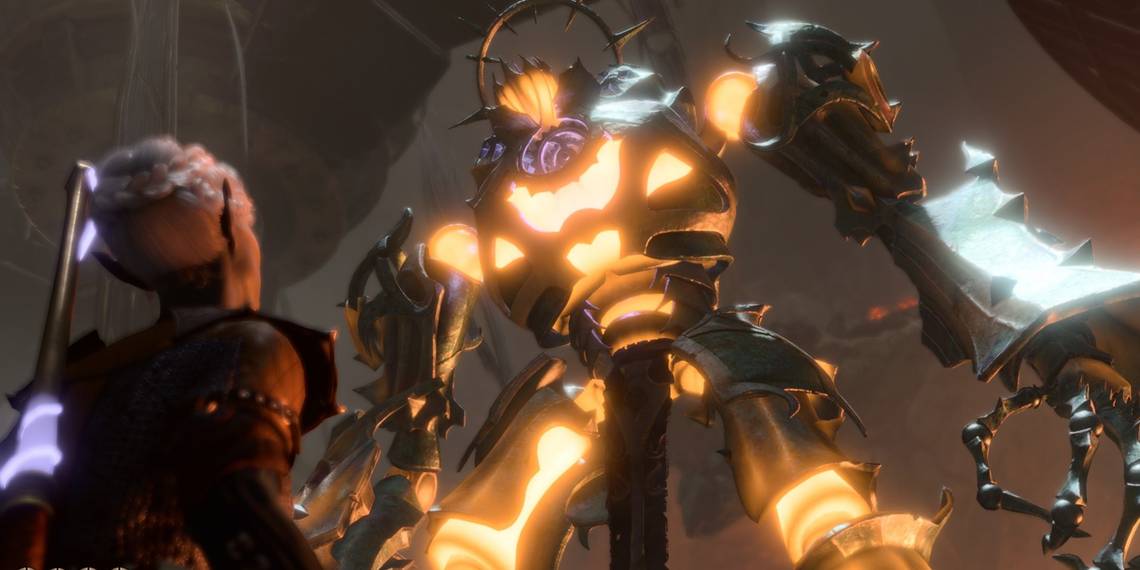
Fight: Grym, The Eternal Protector Of The Forge

Basic Information | |||||||
|---|---|---|---|---|---|---|---|
HP | 225 | ||||||
AC | 13 | ||||||
Speed | 12m (40ft) | ||||||
Size/Weight | Large/5,000kg (Construct) | ||||||
Stats | |||||||
Str | Dex | Con | Int | Wis | Cha | ||
24 (+7) | 6 (-2) | 24 (+7) | 3 (-4) | 11 (0) | 1 (-5) | ||
Resistances | Slashing, Piercing (normally); Cold, Force, Thunder (Superheated) | ||||||
Immunities | Acid, Necrotic, Fire, Lightning, Poison, Radiant, Cold, Force, Thunder, Bludgeoning | ||||||
Vulnerabilities | Bludgeoning (Superheated) | ||||||
Feats | |||||||
Superheated | When superheated, become vulnerable to Bludgeoning and take resistant damage from Cold, Force, and Thunder. | ||||||
Darkvision | Grym can see in the dark up to 12m. | ||||||
Vengeful Guardian | Grym always targets the first creature that successfully hit it that round. | ||||||
Attacks | |||||||
Slam | 10ft melee attack, +12 to hit; ?d? Bludgeoning damage (unknown) | ||||||
Quake | Creates a wave effect in a 30ft radius. +12 to hit; ?d? Bludgeoning damage (unknown). On a failed DEX saving throw, the target is knocked Prone (DC 20). | ||||||
Although the official damage output of Grym is unknown, his typical damage ratio in any given attack averages between 20-35HP. Combined with his massive Strength and numerous resistances, Grym is easily the hardest fight in the early game.
Additionally, he has ranged options with Quake, exceptional movement speed for his size, and a swarm of Magma Mephits (four in total) that rush to his aid once he hits half-health.
It is highly discouraged to attempt this fight below Level 4 or without Bludgeoning-type weapons. Other things that help are:
- A mage with Ray of Frost (Cold damage and reduced movement)
- A reliable healer who can cast Bonus Action Healing Word
- A mage with Misty Step or Faerie Fire
- Good ranged options for all characters

When the fight begins, Grym will be directly in front of you. Have someone placed as far away as possible (but still within range) and strike him. This person will draw his aggression away from the person next to the lava spout.
The goal is to drag Grym away and stand in the center of the forge where the hammer falls. He can only be damaged reliably while Superheated, so having that person next to the lava spout using their Action every two-to-three rounds to refresh the lava is extremely important.
Also, have someone with an action ready to use the lever that brings down the hammer.

Baiting with ranged fire (with Faerie Fire applied) and Misty Step where needed, use your ranged options to position Grym as close to the center of the platform as possible. Ensure he's Superheated, then use the hammer's lever to smash him. This will deal approximately half of Grym's total health. So doing this twice will defeat Grym.

Things get trickier after Grym reaches half-health, however. You'll need to keep Grym near the middle while also dealing with a swarm of Mephits.
Bounce Grym back-and-forth between two characters while the other two deal with the mephits. You want to ensure you deal with them at range as much as possible since they explode upon death.
Magma Mephits are vulnerable to Cold damage. If you brought Ray of Frost, it will work wonders here.

With Grym and the Mephits defeated, the battle will finally end, and the magma will cool. You can loot Grym for a special helm:
"When a melee attack hits you, the attacker is sent reeling for two turns.
Attackers can't land a Critical Hit on the wearer."
And don't forget that your specially-crafted item will be in the mould container. If Grym has collapsed on it, don't worry. You can force it out with spells like Thunderwave or by moving the platform.
With your specially crafted item and Grym's loot, you can return to the lever to hit a switch button on the pipe behind it. This will raise the platform and allow you to leave at your leisure.